Not Yet “Afters”
Today we are celebrating our one year house-iversary!

One year ago today we woke up early, signed closing paperwork, moved two U-hauls worth of furniture, cleaned the condo we had been renting, made a quick Home Depot trip, and started unpacking. My favorite memory of the day was in the evening when my parents brought over Thai food from our favorite local restaurant and we ate at the dining room table surrounded by boxes. It was dusk, so every neighbor who walked by had a clear view into our living and dining room through the big bay window. We waved at everyone who stopped to stare.

We thought our one-year anniversary was the perfect time to show you around upstairs. Both where we started and where we are now. Big thanks to Christine Rich (http://www.bestarlingtonhomes.com/) who gave us permission to use her pictures so you can see some “Befores” of our home. Most of the rooms in our house have come a long way since we moved in but we aren’t ready to call any of our rooms done. Trust me, there is a lot we are simply tolerating at the moment, but I’ll share all the rooms with you anyway:
Exterior:


Living Room:


Dining Room:


Kitchen:


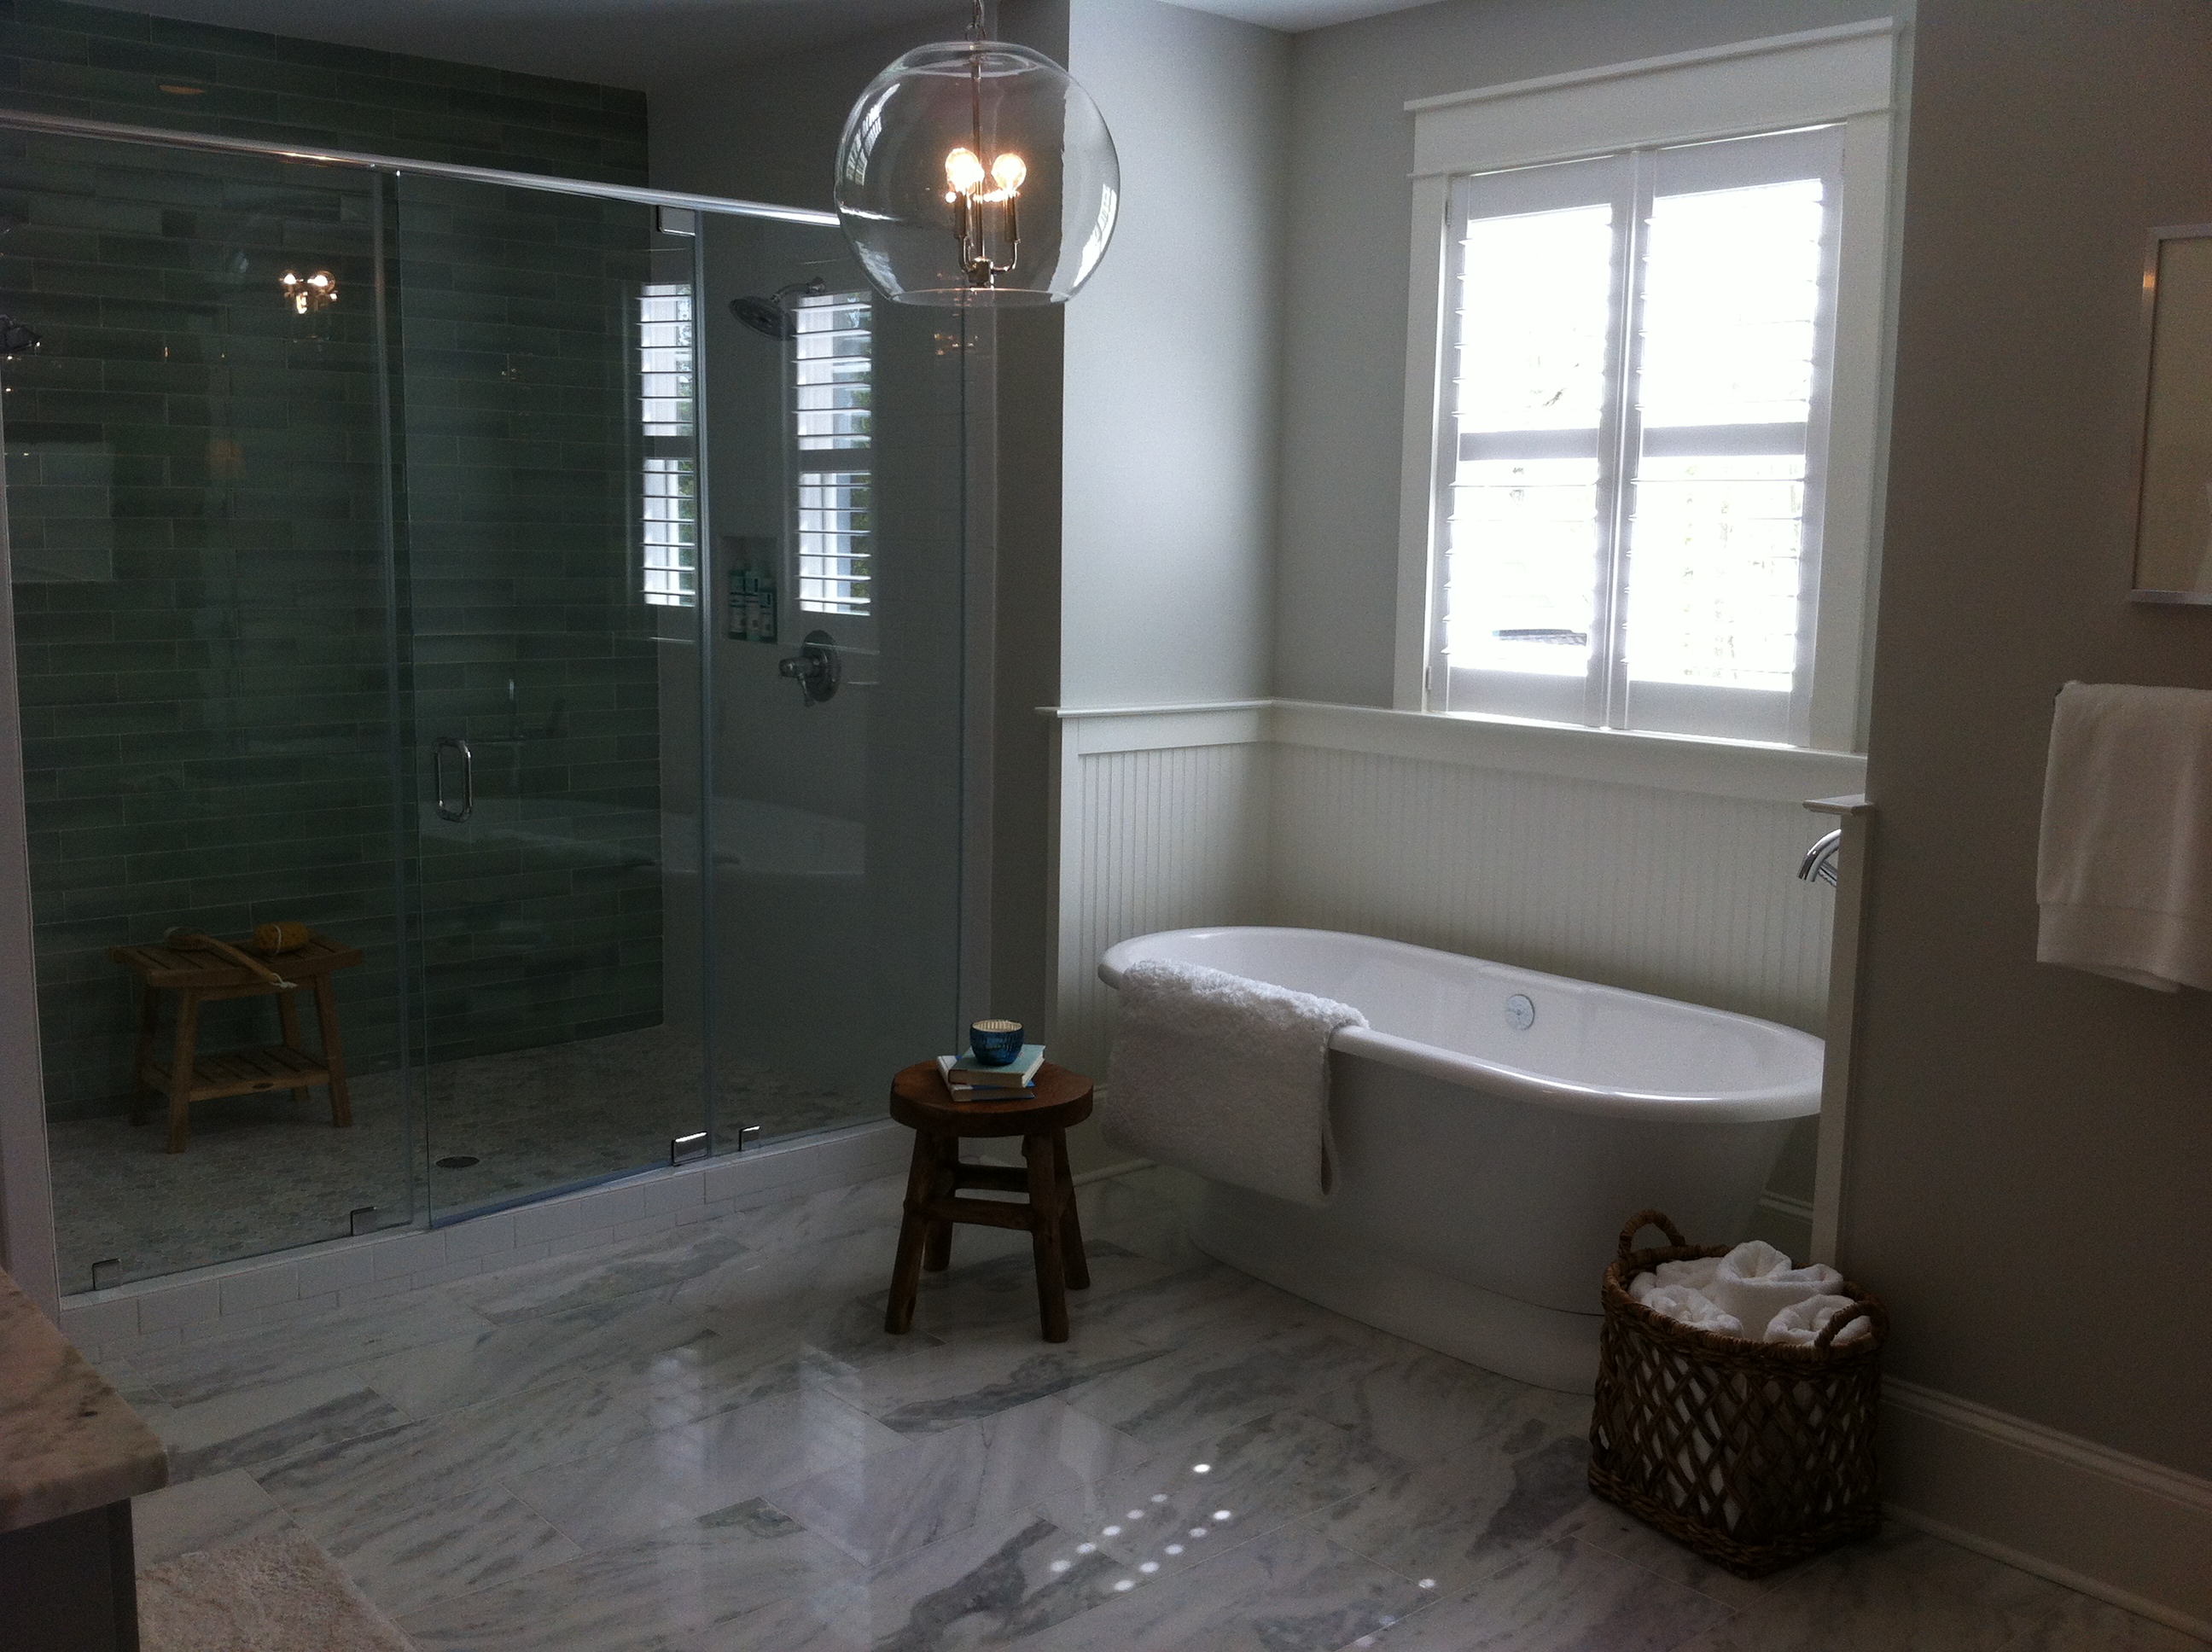
Bathroom:


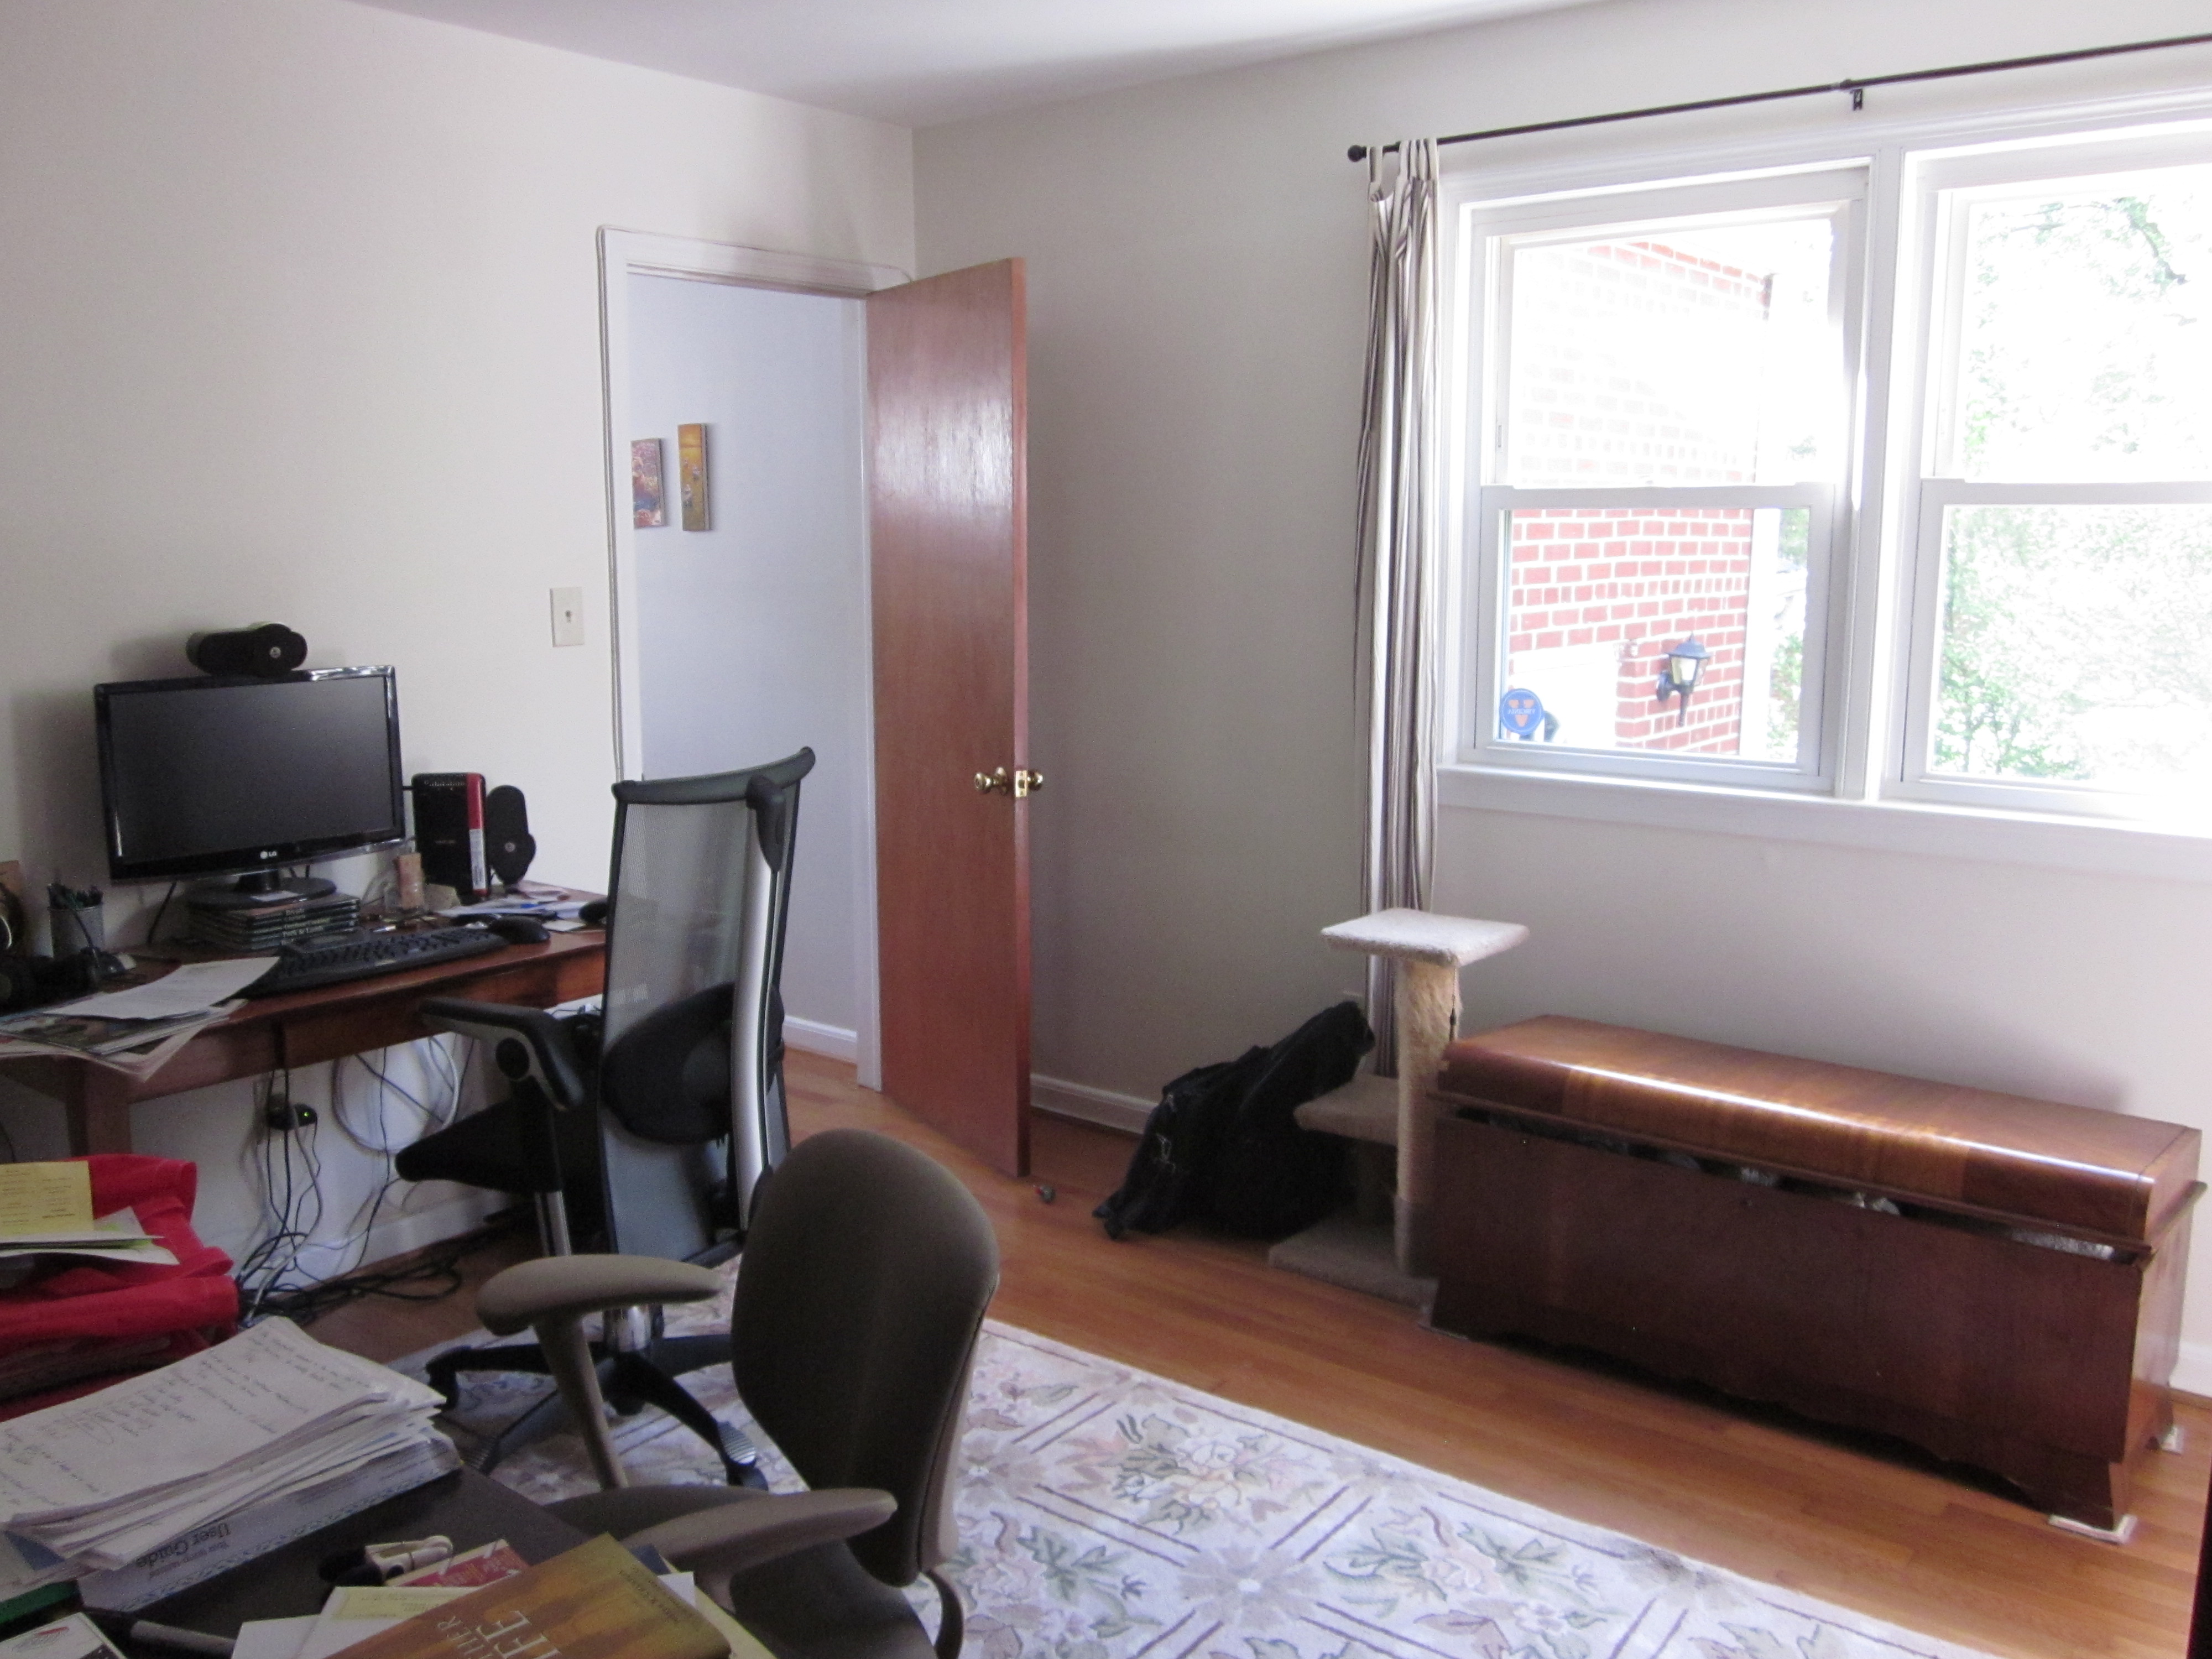
Office:
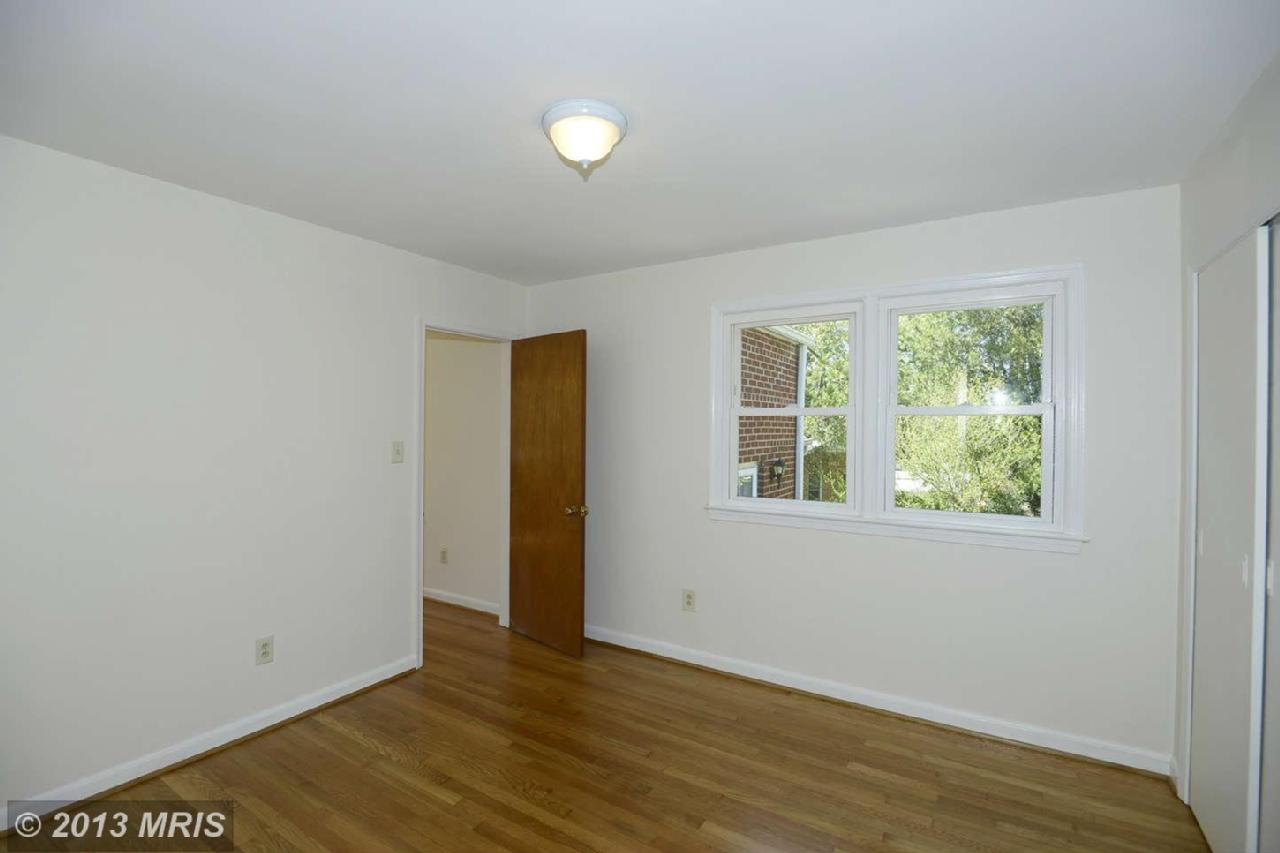
Guest Room:


Master Bedroom:


We still have a loooooong way to go but we are excited with how far we have come in our first year as homeowners. We can’t wait to spill the beans on our basement renovation. I wonder what changes this year will bring.
**We now have a “Home” tab up above so check back to see our progress.
Paper Shade Upgrade
One feature of our house that I fell for right away is our big bay window. It is the cats’ favorite as well:

Paper blinds got us through the better part of a year. Including one cousins weekend:

They actually looked really cool with our Halloween decorations:

After months of avoiding the living room on weekend mornings (paper doesn’t do much to block direct sunlight), we decided to take the plunge on a permanent solution. We could have put curtains above the window moulding but that would have blocked the window seat whenever we closed the curtains, which would not only cut our functional seating but also would make our room feel smaller. We contemplated getting curtain rods specific to bay windows or installing blinds. Ultimately, we decided that we loved the look of plantation shutters in bay windows. They are by far the priciest option but we hope to stay in our house long enough to make it worthwhile. We even justified it as our splurge for the year….which ended up being overshadowed but that is another story for another day.
We got price estimates from two different companies and considered both vinyl and wood shutters. The company we chose charged the same price for vinyl and wood shutters. We floated the idea of only getting plantation shutters for the living room even though the original quote was for the living and dining room windows. They offered us 10% off the total quote if we did both rooms at once, and we signed on the dotted line.
The shutters had to be custom ordered so it was several weeks before two gentelmen were able to come for installation. Of course Al wedged himself into the process as often as he could.


As the shutters were being installed, we learned that nothing about our bay window was plumb. Not even the window seat was flat. The guys who came to install ended up trimming and shaving each shutter so they would fit our wonky windows. Before we added the shutters three of the five window pannels could be opened. We didn’t make a habit of opening them because we didn’t like the way the screens obscured our view and an open window without screens would make our indoor cats outdoor cats. However, it is always nice to have options. We were bummed when we first found out that the shutter trimming and shifting would block our ability to open all but one of the windows. In the end we couldn’t stay mad at our beautiful shutters long.

We ended up removing the white, plastic window grills. John never liked them. I thought they were a good architectural detail but along with the shutters they made the windows too busy.

We have been living with our shutters for about five months now and haven’t yet felt the need to open our single functioning window. Regardless, it feels like a fare trade to be able to use our living room when the sun is out!
Carbon Monoxide Detectors, Detection, Confusion
We purchased smoke and carbon monoxide detectors on the day we closed on our house, but it took us three weeks before we activated and installed them. So it came as quite a shock a few days later when the carbon monoxide detector started tweeting. It made a cute little double tweet sound that we soon learned to fear and loath. Seriously, that sweet little twitter could haunt my dreams.
After determining that double beep meant carbon monoxide and running a makeshift reliability test (taking the detector outside made it stop beeping and bringing it back in made it go off again), we called the non-emergency police number and evacuated the house along with the dinner I was in the middle of prepping.
If you haven’t met all your new neighbors, chopping beets on the hood of your car while an ambulance and two fire trucks pull up with sirens blaring is one option.


The fire department detected low levels of carbon monoxide throughout the house that dissipated down to an acceptable level while they were there. They turned on every gas appliance in the house and said the carbon monoxide was not a malfunction of any appliances (phew) so they suspected it was from a floor drain in our basement with a dry trap. They poured water down the drain and told us to have a plumber come the next day for a full assessment. We thanked them profusely and got a plumber to come the very next day. He agreed that it was most likely a dry trap probably from the house being unoccupied while it was being readied for going on the market. He said that as long as the trap isn’t broken we should just pour water down it a few times a month. We started dutifully pouring water down the drain every time we did our laundry and thought the problem was solved until our carbon monoxide detector went off again….
We called the plumber right back and he was able to send someone the next day. They snaked the ventilation pipe because back pressure from a clogged or improperly vented pipe can cause a suction effect to the water in the trap.

We were told that it was possible the trap was broken but we wouldn’t know unless the alarm went off again….and it did.
So we called back our plumber and he laid out our options. We could:
1) Replace the trap in the floor drain, which would require drilling in the cement floor and re-pouring cement = very pricey
2) Fill the drain with cement, which is less expensive but a very permanent solution in which we are left with no floor drain in case of flooding or any of our appliances leaking- washing machine, furnace, hot water heater.
3) Buy a $10 expandable plug similar to this one
Of course we liked option three best… until the carbon monoxide detector went off again. By this time my mom was so concerned she had gifted us a fancy carbon monoxide detector that displayed the amount of carbon monoxide in the house in parts per million. When we weren’t able to bring down our carbon monoxide levels by opening our windows we called non-emergency once again. We begged the dispatcher not to have the firemen use their sirens this time. They checked all our gas appliances once again and said they were fine so they recommended we call our plumber back.
By this time we were beyond distressed. Not even the experts could figure out the source of the carbon monoxide in our house. We tried to piece together a pattern. We couldn’t pin down anything conclusively, but the alarm sometimes went off after we ran a load of laundry and sometimes when a few people took showers consecutively. We decided to run a little test. We do NOT recommend this strategy and we know that carbon monoxide detectors are not supposed to be located in a furnace room and certainly not directly next to your gas appliances. However, we were desperate so we got creative in an effort to prove our suspicion. We put the carbon monoxide detector next to the hot water heater. It continued reading zero. We turned the basement shower on full blast using hot water and kept our eyes on the carbon monoxide levels. Within a minute it read 60! This was all the evidence we needed. We turned off the water, opened the windows, aired out the house until the meter levels were back to zero, and scheduled to have a new hot water heater installed immediately. Despite our unconventional/incorrect means to an end we have not had a single problem or heard a peep from even one of our THREE carbon monoxide detectors since we installed the new hot water heater. I know they say you can’t buy piece of mind, but this particular purchase felt pretty darn close!

Bonus Hutch!
Thank you to everyone who weighed in on their favorite buffet here!
Last week we went to go check out Buffet # 5 (aka the MadMen-true-50s-style-buffet).

It has a really cool look but it is all drawers. We have a couple of large items (KitchenAid!) that need a safe spot within reach of the kitchen so all drawers isn’t ideal. The drawers were on old metal rollers which made them pretty sqeaky and difficult to open. A bit of WD-40 might be enough to fix the squeaks and skids but for $500 we weren’t willing to find out.
We also made a trip to see Buffet #1 (aka our inspiration) from West Elm.

The store didn’t have a floor sample of the Mid-Century Buffet (above left) but did have the Dumont Buffet (on the right above). The Dumont gave us a pretty good idea of the quality and size we could expect (with the “Mid-Century Buffet” clocking in at 4 inches longer, 1.5 inches shorter, and 2 inches deeper). As expected we really liked the West Elm buffet but the $1025 price tag (price+delivery+shipping+taxes) convinced us to keep our options open.
The last field trip we took was to see Buffet #7 (aka fan favorite and best storage).

It was being sold with matching hutch, which we consider a bonus. We have a hutch, which is currently stuffed to the gills:

When we inherited our current hutch we knew it wouldn’t be a forever piece in our dining room. The blonde wood veneer isn’t our favorite. We considered painting or staining but we don’t love the shape either, which is much harder to manipulate. We might try to paint it a funky color and use it for a liquor cabinet…. or we might Freecycle it. Any suggestions?
We knew we were serious about Buffet #7 before we even walked through the door so we came armed with measuring tape and a notepad. The buffet came in at 71 inches long, 35 inches tall, and 19 inches deep. Both the buffet and hutch are a light cherry color and the drawers opened smoothly. We were even more impressed with the quality in person than the craigslist post had let on. Our one concern was that he buffet was HUGE, which is great for storage but possibly overkill for our little dining room. Once once we got home we taped off the walls and floor to see how they would fit our space.

We will have to move the bar cart and side table to other rooms to make it work but we felt pretty comfortable with how the buffet and hutch would fit our space. Gus felt really comfortable:

The asking price for both items was $350 but we knew from our craigslist search that our area is fully saturated with people trying to sell buffets. We offered $300. He accepted. Our friend Jeff graciously volunteered agreed after much flattery and few details to help us move the furniture.

Once you factor in Uhaul rental and gas we paid almost exactly $350- yes we are suckers and got the uhaul insurance. We were happy with the final price tag considering the runner up options were $500 and $1025. The way I see it we paid less for our buffet and got a bonus hutch!
Here is how they look in the dining room! I’m so happy we no longer have our beautiful gifts on the floor!


Richmond Homearama 2014

This past weekend my friend Rosemary and I drove down to see the Richmond Homearama 2014 (http://richmondhomearama.com/). Actually, Rosemary drove. I attempted to navigate until Rosemary realized I had us 30 minutes off course and had to take over both responsibilities. Sorry!
For Homearama seven builders and designers team up to showcase their talents. My interest was piqued when Young House Love announced they were one of the design teams this year (http://www.younghouselove.com/2013/07/our-other-new-house/).
As we made our way through the seven houses, I stopped to snap our favorite features. I loved this custom wainscoting in the YHL Dining Room. It adds interest to the walls and balances out the charcoal color on the upper half of the walls.

I have always had a thing for built-in banquettes. Unfortunately, John does not share this passion. I have a pipe dream that we might add one in the basement someday. Just what every basement needs. Regardless, YHL had an awesome one in its eat-in kitchen complete with beautifully styled built-in bookshelves. I especially loved the guava accents. Guava has become a buzzword in our family (if only between my mom and me) ever since we decided on our wedding color scheme (spoiler alert to those attending the wedding: guava is the dark peach color):

My favorite room in the YHL house was the master bath. If only we could squeeze all of this into our 4.5x7ft bath!
One house had a secret garden complete with potting bench. Now that is some inspiration we could bring home!

Rosemary and I both loved this TV concealed by a large rustic frame suspended by curtain brackets. John pointed out that in reality, the TV would also have exposed wires and cords. I think there must be a workaround and he is just the engineer for the job 😀

A detail I loved in a hallway office was a suspended rack full of office supplies and craft essentials in mason jars.

My favorite room of the day didn’t fully come across on film as inviting and lovely as I found it to be in person. It was a man cave/media room complete with a bar in the opposite corner. The room got enough light to handle the black wainscoting and built-ins.

One aspect of all the homes I found myself drawn to over and over was the tiled floors and walls. I love all the fun colors and patterns available:

We had a great time on our road trip and homeshow adventure aside from the detour to an adjacent Richmond suburb. Next year we plan to stay local and go to the Tuckahoe Home and Garden Tour (http://tuckahoetour.org/). I’m guessing I won’t be navigating that day either…..
Tiny Room Problems
The first room in the house that called out for attention was actually our smallest: the upstairs bathroom which measures in at just 4.5x7ft.
We decided that after many years of rental bathrooms and tension rod shower curtains we were going to take advantage of owning a home and install what seemed to be the first non-tension rod shower curtain in our house’s 57 years. We went to Home Depot the same day we closed on the house and purchased a curved curtain rod in chrome to match the hardware already in the bathroom.
Similar to this one: http://www.homedepot.com/p/Glacier-Bay-6-ft-Curved-Shower-Rod-in-Chrome-35603SSHD/203601467?N=5yc1vZbz9l
Installation was pretty straightforward until our drill hit what we believe to be cinder block. Our plaster and cinder block surrounded bathroom wasn’t going to blockade us from the mounted shower curtain of our dreams… we dream big apparently. We put several holes in the wall before finding a spot we could get our screws in deep enough to support the curtain, which resulted in a wall mount curtain slightly higher and farther out from the tub but you should see the amazing elbow room inside!
After a few days in the space we ran across several more problems:
•Humidity problems –> Peeling paint revealed that we needed a new (i.e. working) vent and paint that could withstand humidity
•Water issues –> soft/rotting window frame
•Privacy issues –> the opaque window had us trustingly showering for the first week before we realized we were giving the neighborhood a bit of a show (much like the Cell Block Tango dance number from moulin rouge):
All three issues had to be addressed immediately…especially the Moulin Rouge issue. Our temporary solution was to duck tape a trash bag over the window and frame to protect the frame from water and blackout innocent passers by.

We had a professional come out to inspect the window and it turned out the actual rotted part of the frame had previously been torn out and caulked. The old caulk was what was mushy feeling in the frame. We showered downstairs for a few days to allow the frame to fully dry out before ripping out all the old caulk and re-caulking. Once dry we painted the caulk white to match the window trim. We re-caulked around all the bathtub hardware while we were at it. After allowing to dry once more we protected our assets (double meaning if you refer back to problem number 3) by adding a shower curtain in the window. A quick trip to target resulted in the materials needed:

We gave up on the no tension rod in the bathroom dream and simply suspended our cut-to-size shower curtain on a tiny window tension rod. The curtain keeps water away from the window frame and blocks all shower street views.
We concluded that the bathroom paint was peeling because the previous owner had painted with a matte finish so after we had a new vent installed to prevent future humidity problems we painted the room with a mildew primer and white eggshell finish paint. Gus and Al were both quite intrigued by the bathroom antics and joined in whenever they could:


It has been about 8 months since we repainted and we haven’t had one bit of paint peeling since. The only part of the room that we didn’t paint was the ceiling were we have since noticed periodic mildew so we plan to go back through with another sweep of mildew primer + eggshell paint.
Whoever thought having a window inside the shower was a good idea anyway?
Legs for Days
Last weekend my extremely kind, generous, and beautiful maid of honor and her equally generous and beautiful mother threw me a bridal shower.

I was overwhelmed by generosity in the form of dozens of friends and family coming to celebrate with me! And in the form of gifts! So many gifts, in fact, that once we got them home (and by we I mean my sister-in-law single handedly got all the gifts home before I even knew what had happened- thank you Shannon!!) we realized we didn’t have a place to put all our beautiful things!!

We have been discussing getting a buffet for the dining room for a while now but our sudden influx of bounty has put us on the hunt. We haven’t yet decided if we are going to go with a Craigslist/thrift store find or or buy new so we are entertaining all options:

(click on image to enlarge)
1. This beauty comes from West Elm. It is 1950s style which makes sense for our 1950s house. I love the leggy look. The buffet has tons of room for storage but doesn’t look too bulky because of it’s thin legged perch. At $899 + delivery + shipping it serves as more of an inspirational jumping off point than a serious contender.
2. We spotted another leggy posibility on craigslist for only $50. It is a bit more traditional/fancy than our usual aesthetic but the main strike it has against it is it’s size. Although the width and depth are the same as our west elm gold standard above the extra leg length takes away from the functional storage.
3. Craigslist also turned up this sturdy looking buffet for $500. We aren’t in need of wine storage (we have something in the works but I need to get my sander and stain back out before I can share) so unless we could retrofit shelves the sides wouldn’t be very useful to us.
4. This antique beauty is $300 but would require a quick decision (must sell by today). It would also require quite a bit of TLC. Have you started to notice a leggy theme.
5. Another mid-century modern option that was actually built midcentury. It has a cool retro vibe but the off track drawers might drive us crazy.
6. This tiny buffet is so adorable. I don’t dig the current fuchsia paint color but it has great lines. I would love to paint it a crisp white or even a deep ebony. It might be worth the $100 asking price but sadly it is 21 inches shorter than our “gold standard.”
7. Craigslist also revealed this buffet with matching hutch for $350. We think it is the closest match to our West Elm inspiration. It may warrant a field trip.
Do you have a favorite? Let us know what you think!

Recent Comments